Apr 29, 2014 - Building a Knockdown Camping Table
With summer quickly approaching, I thought it would be fun to go camping.
So, I bought a new tent, and gathered a small collection of camping gear.
While researching a few places we might go camping, I was surprised to
learn some campgrounds no longer allow campfires (fire danger). So, I
picked up a small butane stove so we could still prepare our meals.
Developed campgrounds usually have a picnic table, but we can't always
count on that luxury. So, I thought I would build a small table I could
take camping with us. The table didn't need to be very large, I just
wanted a place to set the butane stove and maybe a plate or utensils next
to it.
I found a few commercial tables that collapsed, but they were relatively
expensive and smaller than I was hoping for. Since we would be camping
from the car, I didn't need the light weight of the backpacking
tables.
So, I started looking at options for building my own table. The simplest
would have been a box shaped table that I could turn upside down and
store things in. But, that seemed bulky and would be awkward to store at
home when it wasn't being used. I thought about a simple plywood top with
legs that screwed to the bottom, but I was concerned about stability and
didn't want to spend the money on hardware. In the end, I decided to
build a small table that would knockdown into a few small panels. It
would be sturdy, easy to build, easy to store and transport, and I
wouldn't have to buy any hardware.
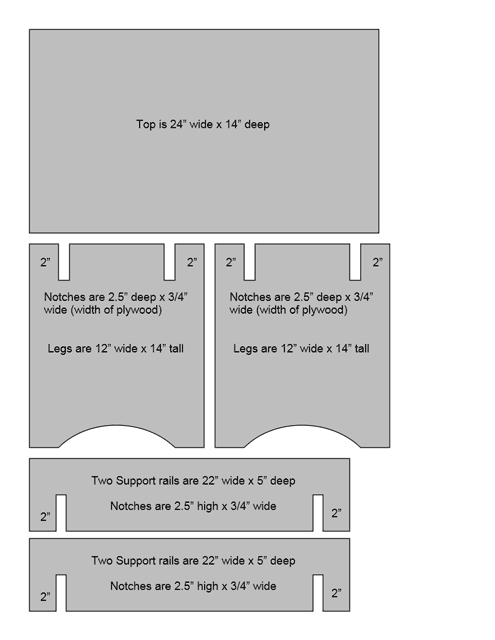
The Plans
The plans are rather basic, just five plywood panels with a few
notches. There is one additional panel that attaches to the bottom of
the table top so it doesn't slide around. It is simply sized to fit
inside the assembled base and screwed to the top.
I had a basic table size in mind, but the dimensions could easily be
adjusted for larger or smaller tables. I came up with my final size by
looking through my scrap plywood cutoffs and adjusting the table to fit
the wood I had available. This allowed me to use up plywood panels I've
been hanging on to for years and not have to buy any new plywood.
I wanted the top to overhang slightly on all four sides, so the
assembled base is 2" shorter in each direction than the top. I wanted
to minimize storage space, so I sized the legs so the two panels next
to each other were the same size as the table top.
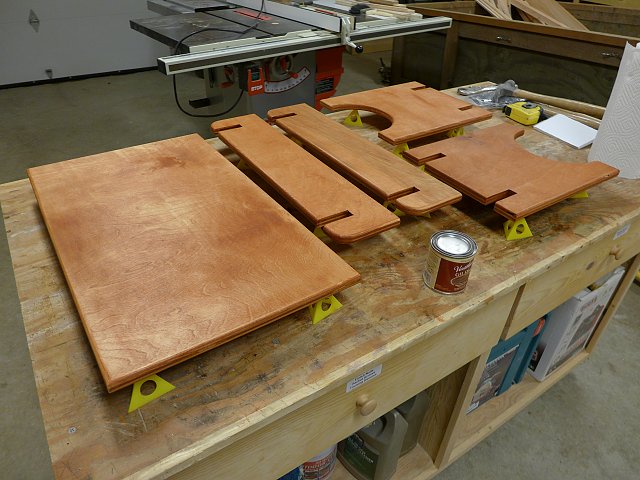
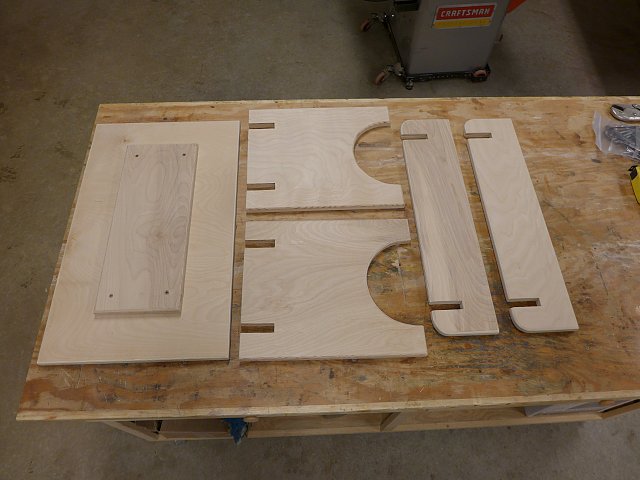
Cutting the Panels
Nothing complicated here, I simply cut out six plywood rectangles on
the table saw, using the dimensions on my plans above. I then marked
out the notches and lower curve and cut them out on my bandsaw.
I traced around a small bucket to layout the curve on the bottom of the
legs. I also traced around a small wood putty can to knock off the
bottom corners of the two stretchers.
I traced around a piece of plywood to get the width of the notches.
Unfortunately, this method made the notch about 1/16" larger than it
needed to be, so the table was kind of wobbly. So, I cut new stretchers
and measured out the width of the plywood rather than rely on tracing.
This gave a much better fit with no wobbling.
To cut the notches, I used my bandsaw to cut down each side of the
notch. Then I cut over to the opposite corner to remove the bulk, then
nibbled away the rest of the remaining waste. This leaves a slightly
jagged edge at the bottom of the notch, but they're concealed when the
table is assembled so it doesn't really matter.
Finally, I used a 1/4" roundover bit to round over the top and bottom
of all panels. I attached the centering panel to the underside of the
table top with glue and four screws.
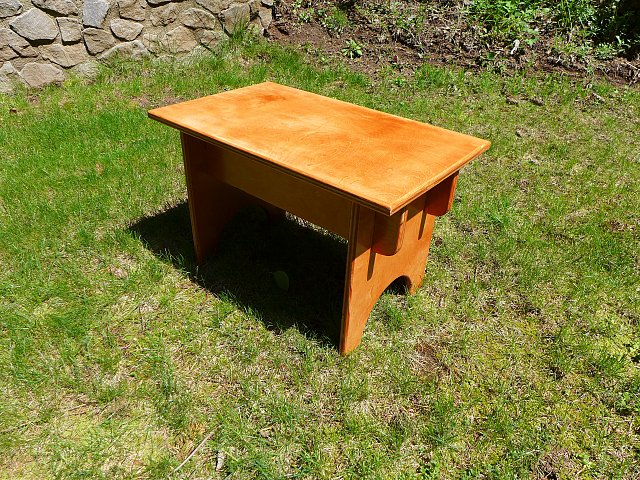
Finishing the Panels
After some light sanding with 150 grit paper, I applied some Varathane
cherry gel stain I had leftover from another project. I let that dry
overnight then applied three coats of Minwax water based gloss
polyurethane. Again, that was leftover from an earlier project.
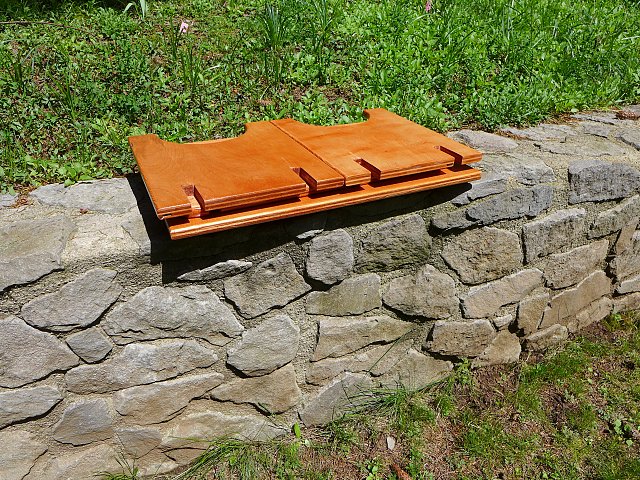
The Collapsed Table
And here we have the finished parts. Unassembled, the full stack is
approximately 24" x 14" x 3". It is lightweight and very easy to store.
I am considering making a small carrying bag for the panels, but don't
know if I will ever get around to that. Everything but the top fits
inside the container with the rest of our camping supplies.
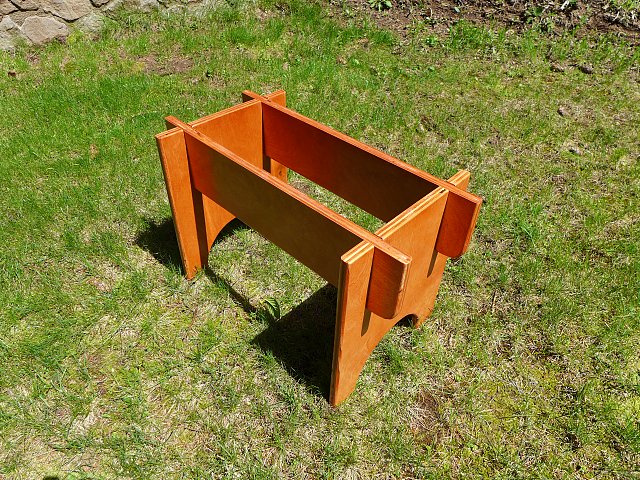
Assembling the Base
Assembly is rather easy, just line up the notches and slide the pieces
together.
I did have to make one slight adjustment after finishing. My notches
were a tight fit, and the thickness of the polyurethane made it hard to
slide the panels together. So, I simply used a file to clean up the
inside of the notches until everything slides together and apart
easily. There is still some slight scuffing of the finish where the
panels slide together, but this isn't fine furniture. They'll take a
beating being used outside anyway.
Add the Top
OK, here's the tricky part. Grab the top with both hands, balance
yourself carefully, and slowly lower the top onto the base so the
centering panel sits inside the base. Try not to fall over and hurt
yourself.
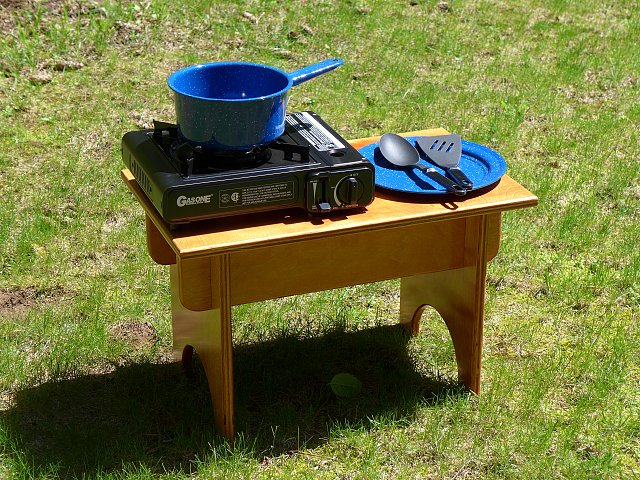
Finished. Ready to Go Camping
And here we have it, the finished table perfectly sized for my little
camp stove and a plate. My wife thinks it's "cute" so that's good
enough for me. It is quite sturdy and even makes a nice bench when it
isn't being used for the stove. Best of all, it was all made with
scraps and leftover finishing materials, so it didn't cost me a thing
to build. I was finally able to use up some of those small plywood
cutoffs I've been hanging on to for the last few years.