I have been trying to clean and organize my shop lately. I quickly
discovered I had lots of small parts stored all over the garage. In
recent years I have been using portable multiple compartment parts
organizers like those from Stanley and Dewalt. These are nice when you need to take an
assortment of screws or nails to a project with you, but the vast
majority of my small parts are things I only use in the shop or home
anyway. I don't need the portability, and the large parts organizers are
expensive and difficult to store. Once I had several organizers, I also
found it difficult to remember which container had the exact part I
needed. So, I decided to switch to individual containers and built a
dedicated cabinet to store them in.
Choosing The Containers
I looked at a lot of different containers
to store my small parts in. I quickly realized one size does not fit all.
I needed long containers to store things like long bolts, tall containers
to store electrical and plumbing parts, and small containers for the
basic nuts, washers, and crimp connectors. I also didn't want to waste a
lot of space between each container, which ruled out things like coffee
cans or baby food jars (I didn't have any of these anyway). Most of the
inexpensive storage boxes have sloped sides that waste space, or have
cheap lids that wouldn't stay on. Ironically, some of the best modular
storage containers are made for kitchen storage, but these tend to be
very expensive.
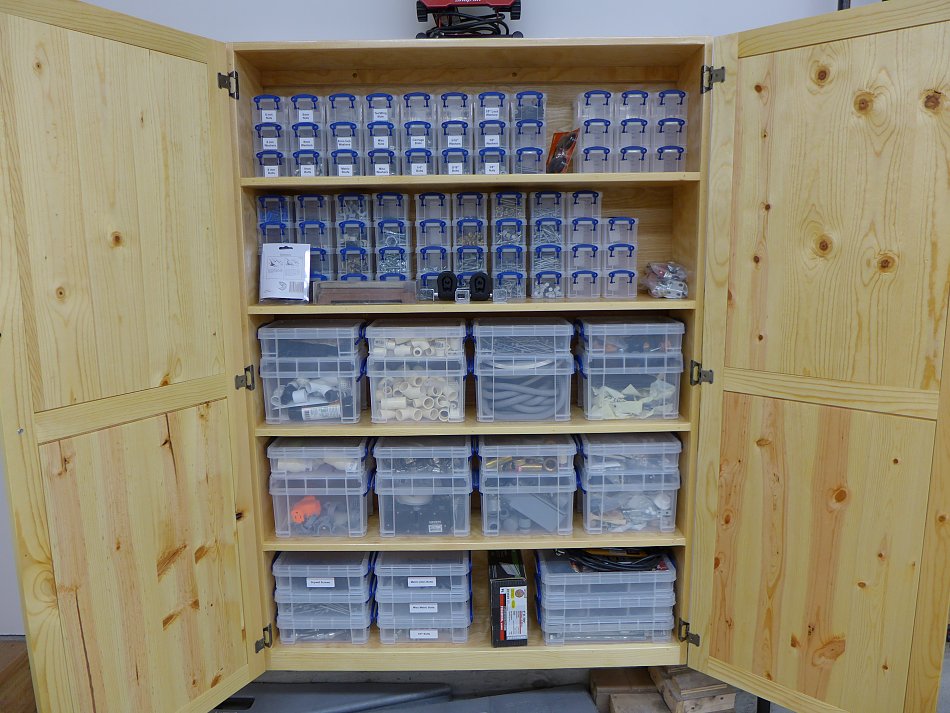
I finally settled on Really Useful Boxes as my storage containers. They are
relatively affordable, come in a variety of sizes, are strong with snap
lock lids, and are widely available at Office Depot, Office Max, or
online at Amazon. After looking at the various items I needed to store, I
chose the 1.75 liter and 3 liter boxes for my mid-size parts, and the .3 liter for my smallest parts. I also grabbed a few
2.5 liter boxes to hold my longer bolts and whatnot.
One of the reasons I chose these sizes is because they are close to the
same dimensions and stack nicely. This came in handy when it was time to
design the cabinet.
Designing the Cabinet
Once I had selected my containers, I could
design the cabinet around them. I wanted to keep the cabinet as slim as
possible, and it needed to fit between my electrical outlets that are
spaced four feet apart. So I lined up a few containers with their
shortest dimensions front to back to see what would fit in that space. I
added about a half inch to the interior width, and about an inch to the
height to allow room for my fingers. That gave me the size for each
shelf, which I could then use to determine how many shelves I could fit
vertically. I could have just built some simple shelves to store the
boxes on, but I knew dust would be an issue in a woodworking shop. So I
decided early on to build doors for the cabinet.
Since I was cleaning out my shop anyway, I tried to make use of any
supplies I already had on hand. The main carcass is made from a sheet of
birch plywood I've had sitting in the garage for a year or two. The door
panels are made from 1x6 tongue and groove siding I've been hanging onto
for years. The back is made with 1/4 inch plywood cutoff's leftover from
other projects. I found brand new hinges and knobs in my parts bin that I
must have bought for a project I never built. So, I used these for the
cabinet doors.
Building the Cabinet
I ripped the plywood into strips then cut them
to length for the sides and shelves. I used a simple jig to cut dado's in
the sides with my router. Unfortunately, my jig was sized for new plywood
from the home center. The plywood I used was slightly thicker, probably
from collecting moisture in the garage. So the shelves were a really tight
fit in the dado's I cut. I should have done a dry assembly first to make
sure everything would fit right, but I didn't. So I had to resort to clamps
and hammers to get things to fit during glue up. I had a similar problem
when I went to assemble the doors. My panels were just slightly too thick
to fit in the grooves nicely. It all worked out in the end, but it would
have been smarter to do a dry assembly first to make sure everything fit
correctly. Live and learn.
Once the cabinet was built I used a flush trim bit to clean up the solid
banding on the front. Then I gave everything a quick sanding and applied
two coats of gloss polyurethane. I screwed the cabinet to the wall, and
started loading it up with the parts boxes. As I filled them up I made
several trips to the local office supply stores to get more containers. I
bought out the inventory at two different stores and had to wait till they
restocked to get more. I could have ordered them online, but the boxes are
actually cheaper in the store than they are online.
Final Thoughts
I am really happy with my new parts cabinet. As I
was cleaning the shop I discovered many small parts I didn't know I had.
So it's nice to have everything in a single location. Since the
containers are clear I didn't bother labeling most of them. However, some
items like nuts and bolts are difficult to identify by sight, so I added
labels to those containers. I bought several extra containers so I have
room to grow in the future.
While the parts cabinet takes care of the majority of my small parts, I
do need to work away from the shop on occasion. It's easy enough to grab
a few of the containers if I need to take them with me. The snap lock
lids ensure that the parts won't spill all over if the box should get
bumped over. However, I do have a few of the Dewalt TStak line of
containers to store my tools, cordless drills, and a small assortment of
screws, nails, and electrical connectors.